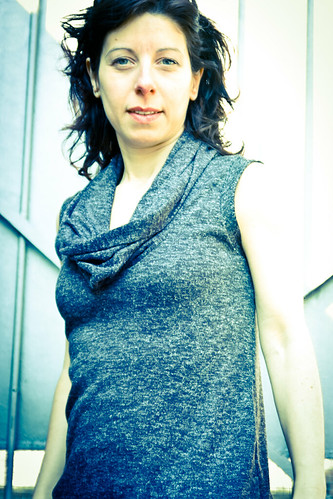
Lately I have been working a lot with knits. You might recognize the fabric from my nightmarish Burda dress. Luckily the cowl neck top was a lot easier to do.
The pattern was rather easy since I took it from a dress I had bought on Etsy some time ago.
My goal for this post is to explain how I put this top together so that you can easily do it too, if you like.
- First you need a knit top that fits you. My pattern is not so tight fitting, but you can easily make it more fitted.
- Then you need to copy the pattern on paper. If you’ve never done it before, have a look at Dana’s tutorial on making your own pattern
- Draw a deeper neckline on the front sloper. How wide or deep is entirely up to you. I made it about one inch from the shoulder point and down about three inches above my chest line. In the drawing below the red line is my new neckline
- You don’t need any adjustments to the back
- You can now cut your front and back sloper
- For the cowl neck, you need to measure the total lenght of your front plus back neckline. Just line your tape measure along the neckline curve. If you are working on a half sloper, multiply by 2.
- Once you have the size draw a long rectangle of fabric. The length will be your total neckline. The height will depend on how tall you want your neck to stand or to drape (as in soft knits like mine). In my case the neck height was about 4 inches, which I multiplied by 2 to a total of 8 inches
- Now you can cut your big rectangle of fabric
- Measure around your front and back armhole. Take note of the separate back and front lenght.
- Draw a shape like in the picture. And mark a notch (red mark) to know where the front sleeve ends and the back begins.

- The shortest side of the sleeve was about 3/8 inch (1cm) and the tallest point about 1.5 inches (3cm)
- Now we are ready for cutting… which we will have to do on the bias on the fold. In fact the sleeve is made of a double layer of fabric
- Remember to cut two sleeves :o)

SEWING TIME
It’s now time to assemble and sew your project. Here is what to do
- Sew your shoulder seams
- Set your sleeves into the armholes. Remember to match your shoulder with the sleeve notch (see red line above)
- Sew your sides and close the sleeves at once. Note that there will only be about 3/8 inch to sew on the sleeve (see drawing)
- Sew your neck cowl rectangle along the short side first. You will have a circle.
- Fold the cowl neck in half along the long side
- Pin and sew your cowl neck around your neckline. Try to put the short side seam at the back or on one side.
- Finish your hem by serging or zig-zag or leave it raw…knits don’t fray.
- You are done! Or you can make a belt if you like…
If you have any questions while reading the instructions, let me know. It’s kind of late in the day and I really wanted to post this tutorial for you!


I like it so much:-)
thanks for the tutorial, surely I will try one!!!
LikeLike
As always excellent tutorial. Looks great on you!
LikeLike
Cute top! I’m never sure if cowls like that look good on me or not, even though I really like them on other people… I may just try it sometime with some not-so-expensive fabric!
LikeLike