

It’s time to do a little sewing for men! And this wasn’t just an excuse to be on the other side of the camera!
E’ ora di un po’ di cucito maschile! E non era solo una scusa per passare dall’altro lato della macchina fotografica!
 I love making shirts. Some time ago I visited Albini’s shirting factory and I couldn’t resist buying some fabric…but before cutting into that precious material… I thought it would be wise to do a test run. I don’t know if you feel the same about sewing for others…but I get quite anxious about it. I really feel the pressure and fear disappointments…not to mention this customer of mine is quite picky 😉
Adoro cucire le camicie. Un po’ di tempo fa ho visitato il cotonificio Albini e non ho resistito…ma prima di tagliare la stoffa preziosa…ho pensato sarebbe stato saggio fare una prova. Non so se vi succeda lo stesso quando cucite per altre persone…a me viene una certa ansia. Sento la pressione e temo che non siano contenti…e poi questo mio cliente è piuttosto esigente 😉
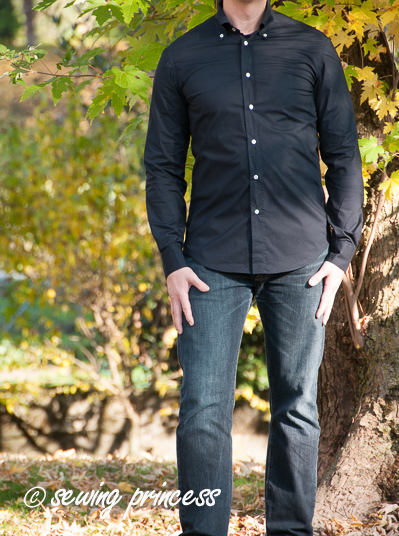
When it came to choosing the pattern…I knew I couldn’t risk it…So I carefully cut off one of his old favorite shirts and traced a pattern from it. I was actually a lot easier that any rub-off method I ever tried. I just had to scratch my head over the shirt placket construction.
Quando mi sono trovata a scegliere il modello sapevo di non poter correre rischi…quindi ho tagliato una delle sue vecchie camicie preferite e tracciato il cartamodello. Ho trovato che questo metodo sia molto piu’ semplice di quelli che avevo provato prima. Ho soltanto avuto qualche grattacapo per capire come costruire l’abbottonatura.

As you can see it’s a semi-fitted shirt with back darts. The fabric I used has some stretch so the fit is slightly different.
Come noterete è una camicia semi-aderente con pinces posteriori. La stoffa che ho usato è leggermente elasticizzata quindi veste in modo leggermente diverso.
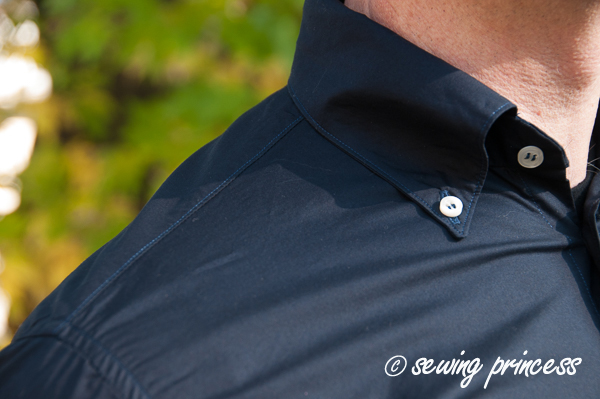
As I made several shirts already there were no surprises construction-wise…except my accidentally gluing some interfacing on the collar and having to sew another from scratch (always ensure no strips of interfacing are lying around on your iron board)….and sewing on the sleeves the wrong way around and only realizing when the shirt was already on the hanger! I’m telling you it’s that pressure!
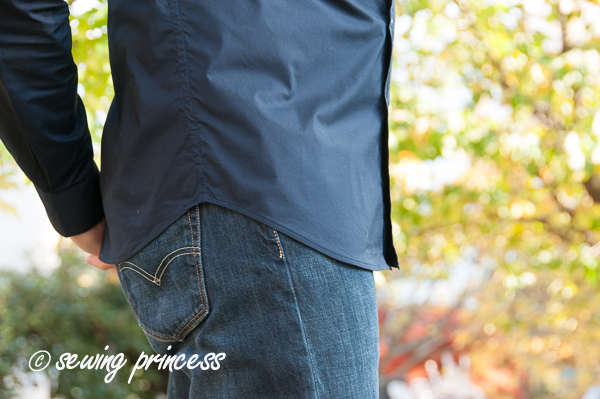
Next time I´ll interface the buttonhole side of the placket. You can´t really see it on the pictures but there´s some unsightly pulling above and below the buttonholes.
Visto che avevo già cucito altre camicie, non ho avuto sorprese…tranne per il fatto che ho accidentalmente attaccato della teletta sul colletto e ho dovuto cucirne uno da zero (assicurarsi sempre che non ci siano pezzettini di teletta autoadesiva dimenticati sull’asse da stiro)…e per aver cucito le maniche al contrario e essermene accorta solo quando avevo finito la camicia! Credo che l’ansia faccia brutti scherzi!
La prossima volta metterò della teletta per rinforzare l´abbottonatura. Forse non riuscirete a vederlo dalle foto ma la stoffa tira un po’ sopra e sotto le asole.

Here is a final shot where you can see what it looks like when it’s tucked in….I guess I can now make another one…my model had loads of fun posing!
By the way… I just found Man Sewing, a guy who sews and also has a sewing tutorials on Youtube….love the graphics!…it’s more quilting than garment sewing. Had you heard about him?
Ecco una foto finale dove potete vedere la resa quando è nei pantaloni…direi che posso farne un’altra…il modello si è divertito molto a posare!
A proposito…ho appeno scoperto Man Sewing, il blog di un uomo che cucie e ha anche video di cucito su Youtube…mi piace molto la grafica! Fa più patchwork che cucito sartoriale. Lo conoscevate?

The shirt turned out great, and your model must be quite happy!
LikeLike
Yes, he was. Thanks. Though he still doesn’t understand why I take so long 😉
LikeLike
Great work. I bet he was well happy! So impressed that you traced an actual shirt. I love making shirts for my Mister too. But not too many… there’s many more things I need! 🙂
LikeLike
Thanks! Yes he was happy and must say I really like that color on him 😉 Of course selfish sewing always comes first!
LikeLike
Complimenti!!!!!
LikeLike
grazie mille!
LikeLike
Now I feel guilty. I have the fabric all ready for a new shirt for the mister but haven’t cut it out yet *hangs head in shame*. You’ve done a lovely job of this. He must be thrilled!
LikeLike
Don’t feel guilty! Some projects are more difficult than others to start…though months have passed since I finished the shirt I still haven’t touched the second one…other projects came in the way! By the way…I forgot to write that I used a mock flat-felled seam…it’s a French seam that I edgestitched…it’s a bit faster though potentially more bulky (so depends on the fabric)
LikeLike
At the moment any project is difficult to get off the ground! I have zero sewjo! I’m hoping a trip to the Knitting and Stitching Show at Harrogate this weekend gives it a kick. I have some lovely fabrics waiting to be worn!
Oh, and I’ve used that mock flat-felled seam before. It’s a very useful alternative!
LikeLike
The wrong sleeve or sleeve wrong way is a steep learning curve eh? You’ll not do that again and thats what I call ‘learning’!! Can I recommend this blog http://mainelydadswintercoat.blogspot.com.au for inspired men’s sewing. He is fantastic. Also David Page Coffin’s new shirt making workbook is great as well as his older Shirtmaking book. I have a tutorial on my blog for those sleeve plackets, I learned from the master of shirt making Mike Maldonado – http://sewniptuck.com/2015/01/21/tutorial-sleeve-tower-placket/ there is also a cuff tute in there.
Lovely job on the shirt, very lucky fella.
LikeLike
thanks so so much for your links…they are super useful! I had attached the right sleeve on the left-hand side and viceversa 😉 I recently bought David Coffin’s older Shirtmaking book…I need to start reading it.
LikeLike
Brava! Complimenti! Wow, very nice! You did a super job, nice job on the flat felled seams. I agree with you on being careful with expensive fabric. I’ve made a couple shirts, and the first one was too small. It taught me always make a prototype from inexpensive fabric. Your model looks like a satisfied customer. Thanks for the link to Cotonoficio Albini. I was just in Albino on Saturday! (Hiked Monte Misma). Honestly, I don’t think you need to add interfacing for the buttonhole, but it’s your call!
LikeLike
Crazy! The Man Sewing, Rob Appel, is from Morro Bay, where my studio éphé mer is. His family used to own the Cotton Ball fabric store and I talked to him when he was running the store. Yes, his quilts are amazing.
LikeLike
Thanks Wendy! This time I used mock flat-felled seams and I was quite happy with the result (avoiding to accidentally cut into my project is also an added bonus). Cotonificio Albini had an open-day back in May/June. If you’re interested in learning about the fabric-making process, it’s totally worth a visit. The store is open all-year-round.
LikeLike
Yes, I’ll try to visit open-day if they have it in May-June 2016. Sounds great! I went to Biella yesterday to a few of the lanafici: Modesto Bertotto, F.lli Cerruti, Pray and Piacenza. Signor Rosa at Lanaficio di Pray was in the shop and truly made it a nice experience. He took the time to explain the difference between worsted and woven wool, and showed us the various animals and their fleece and pulled out a sample of some fleece from a vicuna to show how soft it is and explained how rare it is. Signor Rosa is such a gentleman, passionate about his woolen textiles, and dedicated to his industry. It was a real treat. http://www.dipray.it/home.html
LikeLike
Que pasada!!!! Te ha quedado perfecta, me has dejado alucinada… Esta perfecta a todo detalle!!! Un besazo guapa!!!
LikeLike
Hola guapa! Muchísimas gracias! Los detalles son los que más me gusta en las camisas
LikeLike