Ready for the big reveal? Ready for a large photo gallery and details?
Pronte per vedere il risultato? Pronte per vedere un po’ di foto e leggere un po’ di dettagli?

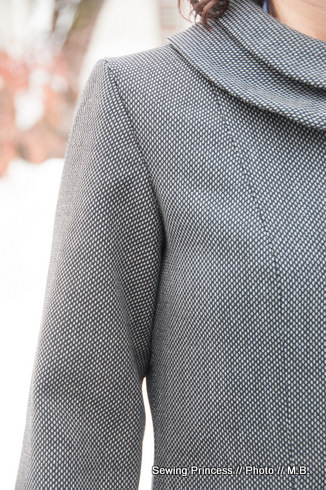
Here is my self-drafted Peter Pan collar I wrote about. Actually the whole pattern was drafted from scratch. If you ever made a princess seam dress you can turn it into a coat.
After having read on Fashion incubator about the need draw both undercollar and upper part, I am fully convinced the result is much better. One remark..I should have made the upper collar wider, it would have been nicer.
Ecco il collo bebé che ho disegnato…in realta’ anche il modello del cappotto e’ disegnato da zero. Se avete fatto un vestito con queste cuciture, potete trasformarlo in un cappotto anche voi.
Dopo aver letto su Fashion incubator che il collo deve avere la parte inferiore leggermente piu’ piccola, mi sono convinta che il risultato e’ effettivamente migliore. Un solo appunto..Il collo superiore doveva essere piu’ largo…sarebbe stato piu’ carino.

The sleeves were an area where another great sewing blog and super-talented person came in handy: Sherry had a superb RTW Tailoring sew-along which I highly reccommend. Eventually I only put the sleeve head but no shoulder pad. My shoulder are wide already and I didn’t want the extra bulk.
Per le maniche ho avuto l’aiuto dei blog di cucito e di persone come Sherry che con il suo corso passo passo sartoriale mi ha dato molti consigli…vi consiglio di dargli un’ occhiata. Io non ho messo la spallina ma solo il rinforzo visto che le mie spalle sono gia’ larghe.
Sherry was so kind to reply to my questions by email. She agreed for me to share this info with you so here they are:
Sherry ha anche risposto a delle domande via email e mi ha detto che potevo condividerle con voi:
Question 1: Do you iron your allowances towards the shoulder inside (e.g. the neck) or towards the sleeve/arm?
Answer: My seam allowances face towards the sleeve/arm, but I don’t iron them. The seam at the sleeve head shouldn’t be pressed flat, it should roll. The sleeve head wadding will sit between the sleeve head and seam allowances. I do press the stitching line from the inside with both layers together, and I think there is a photo me showing this with the tip of the iron.
Domanda 1: Striri i margini verso il collo o verso l’esterno?
Risposta: i margini sono rivolti verso la manica ma non li stiro. La cucitura del colmo della manica non deve essere stirata ma deve arrotolarsi. Il rinforzo della manica va messo tra il colmo e’ la cucitura. Stiro la cucitura dall’interno con i due strati insieme. Credo ci sia una foto in cui mostro che la stiro con la punta del ferro
Question 2: Do you serge or zig zag your seam allowances? If so, before or after setting the sleeve? Do you serge layers together?
My fabric is fray-prone…that’s why I am considering it
Answer: I don’t serge on a tailored jacket that will be lined. Any parts that are fused will not fray. If your fabric is particularly fray-prone, I would tend to hand-overcast the unfused edges after inserting the sleeve, as serging could make it more difficult to ease the sleeve head.
Domanda 2: Rifinisci i margini di cucitura con la taglia e cuci o zig zag? Lo fai prima o dopo aver montato la manica? Unisci i margini della manica e della spalla insieme? La mia stoffa si sfilaccia, per questo volevo saperlo.
Risposta: su una giacca sartoriale che andra’ foderata non passo la taglia e cuci. Le parti con teletta non si scuciranno. Se la tua stoffa si sfilaccia molto, passerei dei punti a mano dopo aver montato la manica. Passare la taglia e cuci potrebbe rendere difficile assemblare la manica.
Question 3: Do you clip the sleeve allowances at the curves?
Answer: I don’t clip anywhere around the sleeve. As mentioned above the seam allowance above the front/back sleeve notches should face the sleeve, and the underarm portion should stand vertical, so clipping is unnecessary.
I thought these answers were great and I hope they can be helpful for you too.
Domanda 3: Fai tagli sui margini intorno alle parti curve della manica?
Risposta: no. Come ti ho spiegato i margini del colmo della manica devono essere rivolti verso la manica e la parte sotto l’ascella deve rimanere verticale, quindi non e’ necessario farlo.
Le risposte sono state utilissime per me e spero possano esserlo anche per voi.


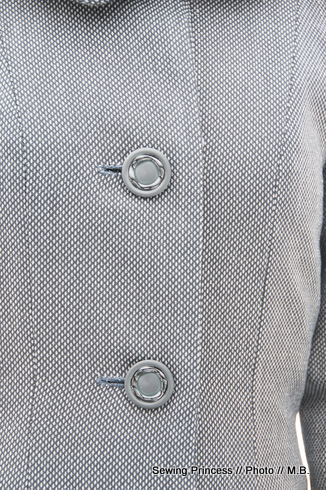
I chose these buttons because they had a vintage look. I added a smaller one below the collar together with an hook and eye to get a more precise look.
I would have like to make bound buttonholes…but the idea came too late in the process (as Karen confirmed) so I resorted to hand-made buttonholes.
Ho scelto i bottoni per il loro look retro’. Ne ho aggiunto uno piu’ piccolo sotto il collo insieme ad un gancetto per far chiudere meglio il colletto.
Avrei voluto fare le asole ad occhiello (si chiamano cosi’) ma ci ho pensato troppo tardi e alla fine le ho fatte a mano
For the lining I decided to go wild and use a wintery print. I know I should have aligned the design in the different pieces but it was getting too time-consuming and I gave up.
For the first time I bagged out the coat fully so it’s completely machine sewn. Again I used Sherry’s bagging out tutorial and Fashion incubator’s bagging tutorial to attach the slevees. Their explanation made the result so much more professional.
Per la fodera ne ho scelta una fantasia con un disegno invernale. So che avrei dovuto allineare il disegno ma ci mettevo troppo e ho lasciato stare.
Per la prima volta ho cucito il tutto a macchina usando le spiegazioni di Sherry e quelle di Kathleen. Grazie a loro il risultato e’ davvero professionale.
And finally the back view in a beautiful snowy weather…northern Italy is covered by snow.
Ecco la parte posteriore con una foto del paesaggio innevato.
And lastly the front…you can see it from my face that I was extremely happy to finally wear my coat. Next day I proudly wore it to work (after ironing the hem better!)
E per finire il davanti…come si nota dalla mia faccia ero davvero contenta di poter indossare il cappotto. Il giorno dopo me lo sono messo per andare in ufficio (dopo aver stirato meglio l’orlo)
Let me tell you that my upcoming projects will be much simpler! Before I leave you I want to thank Michele, my great and funny sewing instructor for the fabric and for all the knowledge he shared with me.
Wishing you a great sewing weekend! Ciao belle!
Vi anticipo gia’ che i prossimi capi saranno molto piu’ semplici! Prima di lasciarvi voglio ringraziare Michele, il mio fantastico e divertentissimo insegnante di cucito per la stoffa e per avermi insegnato molto di quello che so del cucito.
Vi auguro un bellissimo fine settimana di cucito. Ciao belle!


Oh, I get it: you named the coat after your sewing instructor! Silvia, it’s truly beautiful. The collar looks very nice form this end, not to narrow at all, and those buttons are perfect for it. I really like the fabric as well – the outside is classic and will match almost anything, and the inside is just the perfect amount of playful. The fact that you drafted this pattern from scratch blows me away. Thanks for sharing the links to those tutorials. And who cares about snow? With a coat like that you’ll be warm and stylish 🙂
LikeLike
Wow, this is impressive! Beautiful fabric, beautiful buttons and that collar (a feat I can’t even imagine)! I imagine this took a lot of work, but good for you for taking on such a big project and I’m sure it will serve you lots!
LikeLike
You did an amazing job with this coat. The collar is fantastic — it gives the coat a really unique look. And your buttons are fabulous! Thank you for sharing the Q&A and the tutorial links — very helpful for all of us!
LikeLike
That is one gorgeous coat! The lining, the buttons, the detail, all amazing. Definitely some coveting going on on this side of the pond. As Bella says, “PEETEE!!” (That’s pretty in cat talk.)
LikeLike
This is really beautiful! Nice work. I love the collar and it fits you really well.
LikeLike
Dear Princess,
your email box must be full. I cannot reply to what you sent me!
LikeLike
Wow, it’s a gorgeous coat! The collar looks so lovely and I really like the winter print lining! Sounds like you used a lot of couture finishings (handmade button holes!), I’m sure they make the coat even more special!
LikeLike
Lovely lovely coat. The double collar is such a nice detail.
LikeLike
What an absolutely wonderful coat! I totally love your collar, too – it’s like the petals of a flower.
LikeLike
Maravilloso!!!! Te felicito
LikeLike
Niice blog post
LikeLike